உங்கள் blogger post இல் animation read more buttons கொண்டுவரலாம்


Login To Blogger
Go To Layout ---> Edit Html
Click On Expand Widget
Now find the code 
</head>


and paste the below code above it


<script type='text/javascript'>var thumbnail_mode = "no-float" ;
summary_noimg = 300;
summary_img = 700;
img_thumb_height = 90;
img_thumb_width = 200;
</script>
<script type='text/javascript'>
//<![CDATA[
function removeHtmlTag(strx,chop){
if(strx.indexOf("<")!=-1)
{
var s = strx.split("<");
for(var i=0;i<s.length;i ){
if(s[i].indexOf(">")!=-1){
s[i] = s[i].substring(s[i].indexOf(">") 1,s[i].length);
}
}
strx = s.join("");
}
chop = (chop < strx.length-1) ? chop : strx.length-2;
while(strx.charAt(chop-1)!=' ' && strx.indexOf(' ',chop)!=-1) chop ;
strx = strx.substring(0,chop-1);
return strx '...';
}
function createSummaryAndThumb(pID){
var div = document.getElementById(pID);
var imgtag = "";
var img = div.getElementsByTagName("img");
var summ = summary_noimg;
if(img.length>=1) { 
imgtag = '<span style="float:left; padding:0px 10px 5px 0px;"><img src="' img[0].src '" width="' img_thumb_width 'px" height="' img_thumb_height 'px"/></span>';
summ = summary_img;
}
var summary = imgtag '<div>' removeHtmlTag(div.innerHTML,summ) '</div>';
div.innerHTML = summary;
}
//]]>
</script>


Now Find The code 

<data:post.body/>
and replace it by the below code


<b:if cond='data:blog.pageType != "item"'>
<div expr:id='"summary" data:post.id'><data:post.body/></div>
<script type='text/javascript'>createSummaryAndThumb("summary<data:post.id/>");
</script> <span class='rmlink' style='float:right;padding-top:20px;'><a expr:href='data:post.url'><img src='
http://i37.tinypic.com/351icqx.jpg'/></a></span>
</b:if>
<b:if cond='data:blog.pageType == "item"'><data:post.body/></b:if>

Click Save Template .. You are Done


Change http://i37.tinypic.com/351icqx.jpg 
Code with The One You Like Bellow

http://i643.photobucket.com/albums/uu153/nirav07/blue.png

http://i643.photobucket.com/albums/uu153/nirav07/bluish.png

http://i643.photobucket.com/albums/uu153/nirav07/dark-bluish.png

http://i643.photobucket.com/albums/uu153/nirav07/dark-orange.gif

http://i643.photobucket.com/albums/uu153/nirav07/green.png

http://i643.photobucket.com/albums/uu153/nirav07/greenish.png

http://i643.photobucket.com/albums/uu153/nirav07/grey.png

http://i643.photobucket.com/albums/uu153/nirav07/light-blue.png

http://i643.photobucket.com/albums/uu153/nirav07/orange.png

http://i643.photobucket.com/albums/uu153/nirav07/pink.png


Read More

உங்களின் BLOGGERஐ DOMAINக்கு எப்படி மாற்றலாம்


உங்களின் பிளாக்கர் நல்ல TRAFFIC இருக்கும் .அதே சமயத்தில் நீங்கள் .COM,.CO.IN,.NET,.INFO க்கு மாற்றலாம்னு நினைபிங்க கண்டிப்பா உங்கள் BLOGGERஐ DOMAINக்கு மாற்றலாம்.
1.First உங்களின் bloggerஐ sign inசெய்துக்கொள்ளுங்கள் .
 பிறகு  Dashboard > Settings > Publishing செல்லவும் .


2. பிறகு  click on Switch to "Custom Domain".


  custom domain
3.google domain registerக்கு 10$ செலவு ஆகும் .அதற்க்கு முனனால் நீங்கள் விரும்பும் domain name available உள்ளதா என தெரிந்துக்கொள்ளுங்கள் .Ex: raghuvarman.com
  enter custom domain
Take note: Your readers won't be left behind!


notice

your link on their blog roll because it will be automatically redirected to your new domain.


உங்களின் domain check available செய்த பிறகு அதை purchase செய்ய சொல்வார்கள் 

"Powered by GoDaddy.com" or "Powered by eNom". இந்த இரண்டு  domain registration partners of Google. Click on "Learn more" to switch between them. என்னுடைய  suggest GoDaddy.com.

godaddy and enom

  continue with the registration.

Enter your domain name information and remember to check "Automatically renew my registration every year" if you want to keep this domain.


மேலும் இதற்க்கு முக்கியமா credit card/debit card கண்டிப்பா தேவை .இந்த கார்டு purchase செய்வதற்கு பயன்படும் .
நன்றி வணக்கம் ..
Read More

BLOGGERஇல் உள்ள NAVABAR ஐ எப்படி நீக்கலாம்


பெரும்பாலும் எல்லோரடைய BLOGGER லும் NAVABAR இருக்கும் என்று நினைக்கிறேன்  இதை எப்படி நீக்கலாம் என்பதிப்பற்றி பார்ப்போம் 

நீங்க இப்ப பார்க்கிற image தான் navabar 
blogger navbar

நிறைய PEOPLE SEARCH ENGINE மூலமா இதை எப்படி REMOVE பண்ணலாம் என்று KEYWORD வழியாக தேடுறாங்க "Ex:how to remove navabar from my blog"  இதனால் நம்மோடய blogger இன் அழகு மேலும் கூடும் என்பதில் சந்தேகம் இல்லை .நா ரொம்ப பேசறன்னு நினைக்கிறான் ..

1. உங்களின் blogger account ஐ singn in செய்து account open செய்யவும் .

click the layout button
மேலே படத்தில் காட்டப்பட்டுள்ள layout click செய்து உள்ளே செல்லவும் .

2. அடுத்ததாக edit html tabஐ கிளிக் செய்து html pageக்கு செல்லவும். 

   edit html

3.இந்த html code ஐ கீழே படத்தில் காட்டப்பட்டுள்ள html code க்கு பதிலாக copy மற்றும் paste செய்யவும் .
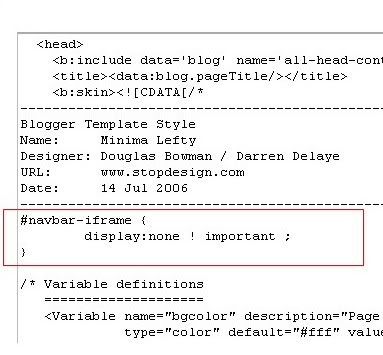
#navbar {
height: 0px;
visibility: hidden;
display: none;
}

add the code like this

இபொழுது save செய்து உங்களின் blogger ஐ பார்க்கவும் .இங்கு navabar hide தான் செய்யப்பட்டிருக்கும் ஆனால் முற்றிலுமாக நீக்கப்பட்டிருக்காது என்பதை தெரிவித்துக்கொள்கிறேன் .


Read More

வாங்க CRICKET விளையாடலாம்

Read More

HOW TO CREATE MULTIBLE GOOGLE TALK


Just follow these simple steps:

Before following these steps make sure that you have installed the Gtalk in your PC.

Step1: Now come to your desktop and Right click on it.

Step2: Now you will be presented with a list op options in the small pop up, click on New then choose Shortcut

Step3: Now just paste the entire thing in the text box that is shown in the pop up window "C:\Program Files\google\google talk\googletalk.exe" /nomutex in case you have installed the application in the "C" drive.

note: If you have not installed Gtalk in the default location just enter the exact path where you have installed the Gtalk application and then type as /nomutex in the text box.

Step4: Now just press the Next button and save it with any name that you like and press Finish.

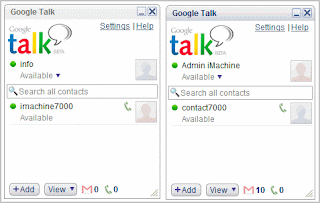
Now you have tweaked the Gtalk and can use more than one account simultaneously.
Read More

HOW INCREASE YOUR COMPUTER PERFORMANCE THROUGH MY COMPUTER


•Start > right-click on My Computer and select Properties.
•Click on the "Advanced" tab.
•See the "Performance" section? Click "Settings".
•Disable the following:

Fade or slide menus into view
Fade or slide ToolTips into view
Fade out menu items after clicking
Show Shadows under menus
Slide open combo boxes
Slide taskbar buttons
Use a background image for each folder type
Use common tasks in folders
There, now Windows will still look nice and perform faster.
Read More

உங்களுடைய SOFTWARE ஐ LOCK செய்துக்கொள்ளலாம்


REQUIREMENT : windows 2000, XP, 2003 and 2008

AppLocker provides us a complete solution to block any programs from being executed on a target computer. You can download this tool for any windows version using AppLocker link. Download it and run the easy setup.

After installation, double click on AppLocker icon on your desktop to start the Application Locker software.  Now this application will display the list of computer software programs like Microsoft Word, Excel, Internet Explorer and many others.


Here click on any application checkbox and then click on Save button to block any software. For example, if you want to block Internet Explorer then select the checkbox of internet explorer and now after saving the change click on Internet Explorer to start it. Here you will get following message:


Now here you can add other application other than the default lock application list, you can lock other programs by clicking the “Configure” button to open the configuration window. Type the caption you want displayed on the ‘Lock application list’. Then, type the programs executable file name and click the ‘Add’ button to add new applications.
Read More

கணினியில் CACHE MEMORY யை அதிகரிக்க சில டிப்ஸ்


CACHE  TEMPERORY STORAGE ஆக பயன்படும். கணினியில் HARD DISK  ஃபைல்களை வேகமாக பரிமாறிக்கொள்வதுக்கு இந்த MEMORY  பயன்படுகிறது. WINDOWS VISTA , WINDOWS XP போன்ற இயங்குதளத்தில் இதனுடைய வேகத்தை எப்படி அதிகரிப்பதை பற்றி காண்போம்.

ஒரு ஃபைல்ளை HARD  டிஸ்கில் COPY செய்து மற்றோர் இடத்தில் PAST செய்தோமானல் கணினியில் அது டிஸ்க் கேச் மெமரில் பதிவு செய்யப்பட்டு
அதன்பின்னர் முதல்நினைவகத்தில்(RAM) பதிவு செய்யப்படுகிறது.மீண்டும் அதே ஃபைல்ளை காப்பி செய்தோமானல் கணினி முதலில் CACHE MEMORY  பார்த்துவிட்டு பின் RAM ல் பதிவு செய்யப்பட்டுகிறது. அல்லவா ! ஆனால் கடைசியாக COPY  செய்த ஃபைல் RAM ல் பதிவு செய்யப்பட்டு இருக்கும்.மீண்டும் ஒரு முறை கணினி CACHE  மெமரிக்கு சென்றுபின் RAM க்கு போகும். இவ்விடத்தில் RAM ல் உள்ள ஃபைல்ளை CACHE MEMORY பரிமாறும் நேரத்தை குறைக்கலாம். இதன் மூலம் முதல்நினைவகத்தில் 256எம்பி க்கு மேல் மெமரியை சேமிக்கலாம்.

விண்டோஸில் START > RUN. அந்த RUN திரையில் regedit என்று தட்டச்சு செய்யவும்.பின் ரிஜிஸ்டரி எடிட்டரில்

HKEY_LOCAL_MACHINE\SYSTEM\CurrentControlSet\Control\Session Manager\Memory Management

LargeSystemCache ல் DWORD டை எடிட் செய்து 0 லிருந்து 1 வரை கொடுக்கவும் .இந்த மற்றம் மூலம் கச்சே மெமரியை அதிகரிக்கலாம்.
Read More

HOW TO SPEED UP IN WINDOWS XP


Here is what you can do yourself to improve your Windows XP’s performance:

Step 1 : Remove unused software

You probably don’t use half the programs you have installed over time. Removing the ones you don’t need anymore can significantly speed up your Windows XP computer. To remove software:
  1. Go to the Control Panel (Start -> Control Panel) and select Add Or Remove Programs. It may take a while for the list to load if you have many programs installed.
  2. Going through the whole list, select programs you rarely use and uninstall them, one by one.
  3. Restart your computer to see the changes.

Step 2: Use Less Graphics

Do you really need a wallpaper and the fancy animations when opening or closing windows? Disabling animations can increase the speed at which your computer opens and closes windows. To disable window animations:
  1. In Control Panel, go to System and select the Advanced tab. Click the Performance Settings tab.
  2. In the Visual Effects window, disable all the animations in the box, or simply select “Adjust for best performance” as shown on the screenshot on the right. Press Apply.
In the same Performance Options window, choose the Advanced tab, and press the Change button in the Virtual Memory area. From there you can change the size of your paging file – a file on your hard drive that acts as RAM. By increasing the size of your paging file, you can significantly increase speed, but be warnedUsing your hard drive as RAM can cause damage to it, so it’s a good idea to buy a better RAM instead.

Step 3: Clean your Registry

You should regularly clean your Windows XP’s Registry to remove old errors that can clog up the registry. To properly clean the Registry, you need a reliable Registry Cleaner software. There are some free ones out there, but I would not be too comfortable with using them. Instead, buy a trusted registry cleaner program so for a little bit of extra cash, you can feel safe. I would recommend FixCleaner, which in addition to cleaning your registry does a number of other things to significantly speed up your Windows XP.

Step 4: Stop unwanted Startup programs

By disabling programs that are set to automatically open when the computer starts, you can greatly speed up your startup process – the time between turning on the computer and being able to fully use it.
Here’s how to disable Startup programs:
  1. Click Run in your Start menu, type msconfig into the box and press enter.
  2. Select the Startup tab.
  3. Go through the list, disabling programs you don’t need by un-ticking the box left of them. Only disable programs you are sure you do not need, and I recommend not touching the ones in the WINDOWS directory.

Step 5: Clean up your hard drive

Performing a disk cleanup can free some hard drive space and also speed up your computer. To use the disk cleanup tool:
  1. Go to Start -> Run and type cleanmgr.exe. Press Enter.
  2. It will probably take a while, especially if you have never used this tool before.

Step 6: Defragment your hard drives

Defragmenting your drives can make a big difference in your computer’s speed. Defragmenting places files physically closer on the hard drive, making it easier and faster for the hard drive to read these files and write new ones. It is a good idea to defragment your hard drive regularily, so it alway stays optimal. I posted a tutorial for an automatic defragment link here: http://www.xptricks.net/windows/xp/2008/01/cool-xp-tips-tricks-automatically-defrag-drives/
There are also a number of commercial defragment programs available, which are more powerful than the Windows tool and come with a wide variety of features. If you don’t want to spend any money on this, I would recommend Auslogics  Disk Defrag, which is a great, free tool.
Here’s how to defragment your hard drives using the built-in Windows tool:Defragment your hard drives - Windows XP tips & tricks
  1. In My Computer, right click on a drive you want to defragment.
  2. Click Tools and select Defragment
  3. Click the Analyse button first, which will analyse your hard drive and see how fragmented it is.
  4. Once the report is finished and the system finds it necessary to perform a defragmentation, press defrag. This will take a very long time, but you have to be patient.

Step 7: Use a PC optimization tool to do the rest

There are a hundreds of other ways to improve your computer’s speed and performance but it is impossible to list all of them here or go through them manually. To fix them, you can either purchase a separate tool for each one, which will end up costing you a fortune, or buy an All-In-One optimization program that will do all the dirty work and fix errors behind the scenes for you. Going through all the steps mentioned above will definitely speed up your Windows XP, but running a  professional tool even after following these manual steps will increase performance even further.
This is why I recommend that you purchase a trusted, reliable solution to fix computer problems for you. I recommend using FixCleaner, because it will fix all of the problems that you can’t manually, and save time on many by fixing them automatically.
FixCleaner has a clean, easy to use interface that lets you fix your PC’s problems even if you did not understand any of the procedures above. Unlike most other tools, FixCleaner is Microsoft Certified, which means that Microsoft has approved the software and that it is safe and reliable. You can download a free tool that will check your computer and produce a report on how much it can be optimized.
Read More

எளிதாக கம்ப்யூட்டரை assembling செய்ய கற்றுக்கொள்ளலாம்


உங்கள் கணிபொறியில் problam வந்திடிச்சா கவலை வேண்டாம் ? நீங்கள் உங்கள் Hardware Engineer-ய் தொடர்பு கொள்ளவதற்கு முன் நீங்கலேஅதை சரி செய்ய முடியும். இந்த Video-ல் கணிபொறியை Assembling செய்வது எப்படி என்று சொல்லி கொடுகிறார்கள் அதுவும் தமிழ் மொழியில் எனவே இந்த வாய்ப்பை நழுவ விடாதிர்கள் .


கணிபொறியை Assembling செய்வது எப்படி? மற்றும் கணிபொறியில் உள்ள Parts-பற்றி அடிப்படையில் இருந்து இதில் கூடுக்கப்பட்டுள்ளது.

ஆகையால் இதை DOWNLOAD  செய்து நீங்களும் கணிபொறியை Assembling செய்ய கற்றுக்கொள்ளுங்கள்.


(இதன் அளவு 580 mb ஒரு மணி நேரம் ஒடக்கூடியது) 


Download Now (580MB) 

Read More

Kaspersky Internet Security 2011 11.0.0.204 Free Download


New Kaspersky Internet Security 2011

Kaspersky Lab announces the UK launch of Kaspersky Anti-Virus 2011 and Kaspersky Internet Security 2011.
The new Kaspersky 2011 products provide innovative cutting edge technology offering faster detection and response rates to IT threats.
Kaspersky 2011 software doesn’t just sit idle until your PC is infected but rather constantly monitors for potential threats meaning they are combated before they can even become a problem. It’s everything computer users need to stay safe and secure online.Kaspersky Internet Security 2011 is a new Kaspersky Lab product for home users that provides complete protection of personal computers from all Internet threats. The solution includes HIPS (Host-based Intrusion Prevention System), an advanced application activity control technology which assigns security ratings to new, as yet unknown programs. It is the first antivirus product to include sandbox technology, which uses virtualization to provide a secure isolated execution environment for applications. Kaspersky Internet Security 2011 also offers users the advantages of Kaspersky Security Network, an innovative distributed malware control system.


Download Now (78.2MB)
Tested spyware free
Read More

நமது கம்ப்யூட்டர் TROJAN VIRUS ஆல் பாதிக்கப்பட்டால் வரும் விளைவு

                                                                                                                                         நண்பர்களே ..நீங்க TROJAN   VIRUS கேள்விப்படிருபிங்க இது ரொம்பவும்
 மோசமான VIRUS இந்த VIRUS எப்டிநமது கணினியில் வந்து உட்க்கராதுன்னு
 தானே உங்க கேள்வி நம்ம சில சமயம் ONLINE இல் மீடியா FILES OR SOFTWARES
 SECURE இல்லாமல் DOWNLOAD செய்வதினால்
அந்த நமது கம்ப்யூட்டரில் ஒட்டுண்ணி போல ஒட்டிக்கொள்கிறது .
அது நமக்கு எந்த வழியில் எல்லாம் தீமையை தருகிறது பற்றி இப்ப பாப்போம் ..
 Credit Card Information
-----> Credit Information
-----> Checking Account Information
-----> Any accounting data
-----> Data bases
-----> Mailing Lists
-----> Personal Addresses
-----> Email Addresses
-----> Account Passwords
-----> Home Office / Small Business Information
-----> Company Accounts / Subscribed for Services
-----> Resumes
-----> Email
-----> Any Company Information / Services He Can Access
-----> Your or spouse's first and last name
-----> Your personal resume
-----> Any school accounts / information
Read More

உங்கள் கணினியில் DON'T SEND ERROR REPORT MESSAGE வருகிறதா


நமது கணினியில் சில நேரம் DON'T SEND ERROR ரிப்போர்ட் அப்டிங்கற MESAAGE அடிக்கடி DESKTOP முன்னாடி வந்து நிற்கும் ..இதனை DISABLE செய்ய ஒரு IDEA இருக்கு இது ஒன்னும் புதுசு இல்ல ஏற்க்கனவே உள்ளதுதான் ..

First goto Right Click ->My Computer
Then goto properties.
Then goto advanced tab
Then click error reporting button


Click on disable error reporting..நன்றி ..
Read More

உங்களுடைய FIREFOX ன் SPEED INCREASE செய்ய


இபொழுது உலகம் முழுவதும் அதிகம் பயன்படுத்திற browser firefox தான் .இன்று அந்த fire fox இன் speed அதிகமாக்க என்ன பண்ணலாம் அப்டிங்கிற பற்றி இன்னைக்கு பார்போம்.
உங்களின் FIREFOX இன் HOME PAGE யை OPEN செய்து URL இல் about:config TYBE செய்து ENTER கொடுக்கவும் ...
பின் CTRL+F  KEY யை பயன்படுத்தி கீழே கொடுக்கப்பட்டுள்ள ஒன்பது CONFIGURATION யையும் MODIFY செய்து கொள்ளவும் ..
Example: no .1 network.http.max-connections-per-server =32
copy this "network.http.max-connections-per-server" press ctrl+f ->பிறகு press ctrl+v [paste]  பின் right side click செய்து modify செய்யுங்கள் ..இது போல ஒன்பதையும் modify செய்யுங்கள் ..
1.network.http.max-connections-per-server =32
2.network.http.max-persistent-connections-per-proxy =16
3.network.http.max-connections = 64
4.network.http.max-persistent-connections-per-server = 10
5.network.http.pipelining = true
6.network.http.pipelining.maxrequests = 200
7.network.http.request.max-start-delay = 0
8.network.http.proxy.pipelining = true
9.network.http.proxy.version = 1.0

Lastly right-click anywhere and select New- Integer. Name it nglayout.initialpaint.delay and set its value to 0. This value is the amount of time the browser waits before it acts on information it receives.
உங்களின் firefox browser யை close செய்து open பண்ணவும் இப்போ உங்களுக்கே தெரியும் கண்டிப்பாக browser இன் speed அதிகமாகவே இருக்கும் என்பதில் சந்தேகமே இருக்காதுன்னு நினைக்கிறன்..நன்றி ..உங்களின் ஓட்டை ஒட்டுப்பட்டையில் பதிவு செய்ய மறந்திடாதிர்கள் ..
Read More

உங்களின் WEBSITE GOOGLE SEARCH ENGINE TOP 10 இல் கொண்டுவரணுமா


பிளாக்கர் ,DOMAINE SITE ஆரம்பிச்சிருப்பாங்க ஆனால் இணையதளதிற்கு வருகை தரும் VISITORS இன் எண்ணிக்கை மிகவும் குறைவாகவே இருக்கும் .இதற்கு என்ன காரணம் ?...சரியான KEYWORDS நீங்க தேர்ந்தெடுக்கவில்லை என்றே அர்த்தம் ..K இதற்கு என்ன செய்தா உங்க இணையதளத்திற்கு VISITORS வருவாங்க அப்டின்னு இப்ப பார்ப்போம் ..அதுக்கு முன்னால ஒரு சின்ன EXAMPLE :
GOOGLE ENGINE இல் கம்ப்யூட்டர் டிப்ஸ் KEYWORD கொண்டு SEARCH பண்ணுங்க ...கீழே படத்தை பாருங்க 
google

www.raghuvarman.co.cc இந்த இணையதளம் தான் first இடத்தை தக்க வைத்துக்கொண்டுள்ளது . இது நீங்களும் keyword select செய்து உங்களின் blogger or domain site build செய்ய்ங்கள் கண்டிப்பாக visitors அதிகாமாக வருவாங்க ..traffic அதிகமாகும் ..

உங்களின் ப்ளாகரில் design->html இல்  <head>க்கு கீழே இந்த meta tag ஐ copy செய்து சிவப்பு கலரில் உள்ள பகுதியை மட்டும் நீங்கள் edit செய்து save செய்து கொள்ளுங்கள் ..
<b:include data='blog' name='all-head-content'/><meta content=' your description ' name='description'/><meta content='your keywords' name='keywords'/><meta content='your name' name='author'/>

ஒன்று அல்லது இரண்டு மாதங்களில் உங்களின் இணையதளமும் top 10 இல் வரும் .
கீழே உள்ள ஒட்டுப்பட்டையில் உங்களின் ஓட்டை பதிவு செய்ய மறந்திடாதிங்க..நன்றி ..


Read More

SETUP ADSENSE DOMAIN USING FREE DOMAIN CO.CC

1. Login to your Google Adsense account, click the Adsense Setup tab at the top and then select Adsense for Domains.
2. Enter your domain name
கீழே உள்ள படத்தை பார்த்து உங்களின் domain add பண்ணுங்க ..
3. இங்கே உங்களின் adsense pub id  verify செய்துக்கொள்ளுங்கள்  (pub-xxxx).
4. Login to your Co.cc account பிறகு select Domain Settings.
5.  உங்களின் domain setup click செய்து 2 zone இல் கொடுக்கப்பட்ட setting ஐ பதிவு செய்துக்கொள்ளுங்கள் ..save ok..
6. The last step is you must enter your CNAME. Just enter “pub-xxxxx.ard.ghs.google.com”. Replace xxxx with your Adsense publisher code.
7. Congratulations, உங்களின்  Co.cc free domain setup   adsense domain மாற்றம் செய்தது உறுதி செய்யப்பட்டதுன்னு message வரும் .
உங்களின் ஓட்டை பதிவு செய்ய மறந்திடாதிங்க நன்றி ..
Read More