Showing posts with label BLOGGER TIPS. Show all posts

bloggerஐ எப்படி வேறொரு emailக்கு மாற்றலாம்


உங்களின் blogger ஐ மற்றொரு ஈமெயில் முகவரிக்கு எப்படி மாற்றலாம் என்பதை இன்று பார்ப்போம் .
1.Login to Blogger Dashboard.
2.Click on "Settings" on your dashboard
3.Click on Export blog on your blog tools
4. save it your blogger documents
5.click puplishing on your dashboard
6.change your blog website address
7.Click on "Settings" on your dashboard
8.click on delete on blogger tools


Read More

blogger இல் Random Posts Widget


முதலில் Blogger Dashboard => Design => Add Gadget => Html/Javascript செல்லவும்.

பிறகு பின்வரும் Code-ஐ Paste செய்யவும்.


<script type="text/javascript">

var randarray = new Array();var l=0;var flag;

var numofpost=6;function randomposts(json){

var total = parseInt(json.feed.openSearch$totalResults.$t,10);

for(i=0;i < numofpost;){flag=0;randarray.length=numofpost;l=Math.floor(Math.random()*total);for(j in randarray){if(l==randarray[j]){ flag=1;}}

if(flag==0&&l!=0){randarray[i++]=l;}}document.write('<ul>');

for(n in randarray){ var p=randarray[n];var entry=json.feed.entry[p-1];

for(k=0; k < entry.link.length; k++){if(entry.link[k].rel=='alternate'){var item = "<li>" + "<a href=" + entry.link[k].href + ">" + entry.title.$t + "</a> </li>";

document.write(item);}}

}document.write('</ul>');}

</script>

<script src="/feeds/posts/default?alt=json-in-script&start-index=1&max-results=1000&callback=randomposts" type="text/javascript"></script>

சிவப்பு நிறத்தில் உள்ளதை நீங்கள் edit செய்து எத்தனை பதிவுகள் தெரியவேண்டும் என நீங்கள் நினைக்கிறீர்களோ, அந்த எண்ணை போடவும்.பிறகு Save பட்டனை click செய்யவும்.
Read More

blogger இல் post atom ஐ எப்படி remove செய்வது

நண்பர் மாணவன் அவர்கள் தமது தளத்தை பற்றி நிறை குறைகளை தினமும் நம்மிடம்  பகிர்ந்து கொண்டே இருக்கிறார் .இது நமக்கு மிகவும் சந்தோசம் அளிக்கிறது .உங்களின் கருத்துக்கு மிக்க நன்றி நண்பரே ..நமது பிளாக்கர் இல் கீழ் பகுதியில் post atom என்ற பகுதியை நீங்கள் பார்த்து இருப்பீர்கள் அதை எப்படி நான் நீக்குவது பற்றி இன்று பார்ப்போம் நண்பரே ..
Blogger Basics
  1. Go to dashboard/ template/ edit HTML
  2. Click the 'Expand Widgets Templates' box
  3. Find:


<b:if cond='data:blog.pageType != "item"'> <!-- Blog feed links -->
<b:if cond='data:feedLinks'>
<div class='blog-feeds'>
<b:include data='feedLinks' name='feedLinksBody'/>
</div>
</b:if>


Remove this line:
<b:include data='feedLinks' name='feedLinksBody'/>
Read More

உங்கள் blogger ஐ சேமித்து வைத்துகொள்ளும் மென்பொருள்

உங்கள் blog ஐ Back-Up எடுக்க ஒரு அருமையான மென்பொருள் இணையத்தில் உள்ளது. இதனை தரவிறக்க செய்ய  இங்கே க்ளிக் செய்யவும்.

இதனை, உங்கள் கணினியில் நிறுவிய பின், வரும் விண்டோவில், Add/Update/Remove blogs என்பதனை தேர்வு செய்யுங்கள்.


பின்னர் உங்கள் பிளாக்கர் username மற்றும் password கொடுத்து, Log into blogger to get blogs என்பதை க்ளிக் செய்யுங்கள்.


இப்பொது உங்களின் பிளாக்கர்  அனைத்தும் பட்டியலிடப்படும். ஒவ்வொரு ப்ளாகையும் தேர்வு செய்து, சேமிக்க வேண்டிய போல்டரை கொடுத்து சேமித்துக்கொள்ளுங்கள்.

Read More

BLOGGER POSTஇல் READMORE OPTION ஐ கொண்டுவர


உங்களின் BLOGGER POSTஇல் READMORE என்ற OPTION கொண்டுவரலாம் .


Go to Layout -> Edit HTML and click the ‘Expand Widget Templates’ check-box .

 CTRL+F PRESS COPY THIS TEXT  </head> PASTE IN YOUR FIND BOX.

பிறகு கீழ் காட்டப்பட்டுள்ள படி HTML CODE ஐ COPY PAST செய்யவும் .

]]></b:skin>
<style><b:if cond='data:blog.pageType == "item"'>
span.fullpost {display:inline;}
<b:else/>
span.fullpost {display:none;}
</b:if></style>
</head>


அதே போல் PRESS KEY CTRL+F  COPY  THIS TEXT  <data:post.body/> பிறகு FINDBOX இல் PASTE செய்து இந்த (<data:post.body/>) HTML CODE ஐ கண்டுப்பிடித்து கீழ் படத்தில் காட்டிஉள்ளவாறு  


<div class='post-body entry-content'>
 <p><data:post.body/>
 <b:if cond='data:blog.pageType != "item"'><br/>
 <a expr:href='data:post.url'>Read More</a>
 </b:if>
 </p>


இபோழுது SAVE TEMPLATE கொடுத்து வெளியே வரவும் .
நீங்கள் எந்த POST இல்  READ MORE கொண்டு வரணுமோ அதில் மட்டும் கீழ்கண்டவாறு செய்ய வேண்டும்

LAYOUT -->POST-->EDITPOST சென்று POST இன் EDIT HTML பக்கத்திற்கு சென்று POST இன் ஆரம்பம் <span class="fullpost"> இந்த HTML ஐ COPY PAST செய்யவும் .நீங்கள் பதிவின் எந்த பகுதியில் READMORE OPTION ஐ கொண்டுவரனுமோ அதில் இந்த </span> html ஐ paste save செய்து கொள்ளவும் .இபொழுது உங்கள் blogger  இன் home page இல் readmore வந்துள்ளதை  பார்க்கலாம் .

block colour html ஐ மட்டும் copy paste செய்யவும் .
Read More

உங்கள் BLOGGER இல் SCROLL BOX அமைக்க வேண்டுமா


உங்களுடைய BLOGGER  பதிவுகளில் சில TEXT ஐ மட்டும்   தனித்துக் காட்ட நகரும் பெட்டி [scroll box]அமைக்கபடவேண்டியுள்ளது .


அல்லது
BLOGGER இன்  SIDEBAR இல் நீங்கள் வைத்திருக்கும் விட்ஜட்டுகளை SCROLL BOX இல்  அமைக்கவோ செய்யலாம்.
அதற்கு கீழே உள்ள CODE ஐ COPY  செய்து உங்க பதிவில் சேர்க்க வேண்டியதுதான்.


<div style="border: 1px solid #aaa;background- width:350px; height:250px; overflow:auto; "><p>

TEXT HERE

</p>
</div>


பதிவின் எந்தப் பகுதி நகரும் பெட்டிக்குள் வர வேண்டுமோ அதை "TEXT HERE " என்ற பகுதிக்கு பதிலாக நீங்கள் பதிவு செய்ய விரும்பும் TEXT ஐ அந்த இடத்தி PASTE செய்ய வேண்டும்.இந்த விளக்கம் உங்களுக்கு போதுமானதாக இலையினில் COMMANDS செய்யவும் உங்களுக்கு பதில் அனுப்புகிறேன் நண்பரே ..
Read More

உங்கள் BLOGGERஇல் உள்ள FEVICON ஐ எப்படி மாற்றலாம்


வணக்கம் நண்பரே உங்களின் தளத்தில் FEVICON LOGO வை எப்படி மாற்றலாம் என்பதைப்பற்றி இன்று பார்க்கலாம் .BLOGGER தளங்களில் நீங்கள் பார்த்திருப்பீர்கள்
இது போன்று LOGO இருக்கும் .
Blogger Icon

உங்களுக்கு பிடித்தமான FEVICON LOGO வை இங்கே சென்று உருவாக்குங்கள் .
fevi

அதற்கு கீழே DOWNLOAD FEVICON  என்ற LINK ஐ CLICK செய்து DOWNLOAD செய்துக்கொள்ளுங்கள் .


இந்த ICON ஐ .PNG FILE FORMAT க்கு மாற்றம் செய்ய வேண்டும் .இங்கே CLICK செய்து
.ICON to .PNG FILE க்கு மாற்றிக்கொள்ளுங்கள் .
fev2
பின்பு அங்கே கொடுக்கப்பட்டுள்ள Click here to download your Favicon.ico File  இதை கிளிக் செய்து தரவிறக்கம் செய்து கொள்ளுங்கள் .
மீண்டும் இந்த file ஐ link ஆகா மாற்றம் செய்யவும் .இதற்க்கு இந்த தளத்தினை பயன்படுத்துங்கள் கிளிக் .
fevicon logo வின் link உங்களுக்கு கிடைத்துவிடும் .பின்பு html code ஐ பயன்படுத்துங்கள் .

go to ..LAYOUT--> HTML PAGE
PRESS  CTRL+F find it  <b:skin><![CDATA[/* 
இந்த html code க்கு மேலாக கீழ் கொடுக்கப்பட்டுள்ள html ஐ copy & paste செய்யவும் .

<link href='http://www.hostanyphoto.com/files/72611951754754741165.png' rel='shortcut icon' type='image/vnd.microsoft.icon'/> 

இந்த "http://www.hostanyphoto.com/files/72611951754754741165.png" link க்கு பதிலாக நீங்கள் உருவாக்கிய link ஐ இங்கே replace செய்யவும் நண்பரே .
கடைசியாக save செய்து உங்களது blogger ஐ பார்க்கவும் .இபொழுது உங்களின் fevicon logo மாற்றம் அடைத்திருக்கும் .

பிறகு என்ன உங்களின் blogger ஜொலிக்கும் தானே ...உங்களுக்கு ஏதேனும் சந்தேகம் இருந்தால் கீழ் உள்ள command box இல் தெரியபடுத்தவும் நண்பரே ..நன்றி !
Read More

BLOGGERஇல் EMAIL CONTACT FORM உருவாகலாம்


உங்கள் BLOGGER  தளத்தில் வருகை தரும் அன்பர்கள் சில சந்தேகங்களுக்கு உட்படலாம் .எனவே அவர்கள் உங்களை நேரடியாக தொடர்பு கொள்ள முடியாத நிலையில் இருக்கும் பட்சத்தில் இந்த CONTACT FORM அவர்களுக்கு பயனுள்ள வகையில் இருக்கும் .


1.Log in to your dashboard--> LAYOUT

2.Click on "Add a Gadget".Now Select "HTML/Java Sricpt"

3.Copy and Paste below code into it.


<FORM action="mailto:you@yourdomain.com" method="post" enctype="text/plain"><TABLE BORDER="0" CELLSPACING="0" CELLPADDING="4" WIDTH="90%"><TR><TD width="30%"><DIV align="right"><B>Name:</B></DIV></TD><TD width="70%"><INPUT type="text" name="name" size="20"></TD></TR><TR><TD><DIV align="right"><B>Email:</B></DIV></TD><TD><INPUT type="text" name="email" size="20"></TD></TR><TR><TD><DIV align="right"><B>Comment:</B></DIV></TD><TD><TEXTAREA name="comment" cols="30" wrap="virtual" rows="4"></TEXTAREA></TD></TR><TR><TD>&nbsp;</TD><TD><INPUT type="submit" name="submit" value="Submit"><INPUT type="reset" name="reset" value="Reset"></TD></TR></TABLE></FORM>

Note:Replace you@yourdomain.com with your real E-mail address.
4.Now Click Save.Your Email look like below one.
Name:
Email:
Comment:
Read More

SNAPSHOT உங்களது BLOGGER இல் எப்படி உருவாக்குவது


மேலே  உள்ள புகைப்படத்தை பாருங்கள் SNAPSHOT என்பது புரியும் .பல்வேறு  WEBSITE அல்லது BLOOGER இல் இதை பார்த்திருக்கலாம். இதை எப்படி நமது தளத்தில் கொண்டுவருவது பற்றி இன்று பாப்போம் நண்பரே ...

1.Log in to your dashboard--> layout- -> Edit HTML

2.Scroll down to where you see this:
</body>
3.Now copy below code and paste it before above code.
<script language="javascript" src="http://thumbnails.iwebtool.com/src.js?border=004891" type="text/javascript"></script>
பிறகு பாருங்க உங்களின் தளத்திலும் SNAPSHOT தான் .


Read More

RECENT POST WIDGET உங்கள் BLOGGERஇல் வேண்டுமா


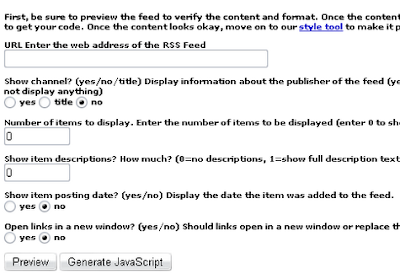
1.First Go to Feed2JS Website.கீழே உள்ள படத்தை பாருங்கள் .

2.கீழே உள்ள FORM ஐ பூர்த்தி செய்யவும் .
URL Enter the web address of the RSS Feed :
http://yourblogname.blogspot.com/feeds/posts/default
Fill Other informations as your choice.Look at the example below.

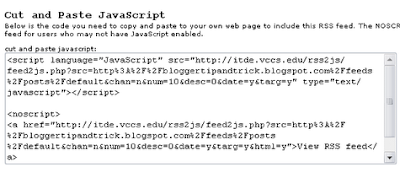
3.Now Click on 'Generate JavaScript'.Now you can get your JavaScript code.

4.Log in to your dashboard--> layout- ->Page Elements
5.Click on 'Add a Gadget' on the sidebar.

6.Select 'HTML/Javascript' and add your JavaScript code and click save.
Now You are done.
Read More

உங்கள் blogger post இல் animation read more buttons கொண்டுவரலாம்


Login To Blogger
Go To Layout ---> Edit Html
Click On Expand Widget
Now find the code 
</head>


and paste the below code above it


<script type='text/javascript'>var thumbnail_mode = "no-float" ;
summary_noimg = 300;
summary_img = 700;
img_thumb_height = 90;
img_thumb_width = 200;
</script>
<script type='text/javascript'>
//<![CDATA[
function removeHtmlTag(strx,chop){
if(strx.indexOf("<")!=-1)
{
var s = strx.split("<");
for(var i=0;i<s.length;i ){
if(s[i].indexOf(">")!=-1){
s[i] = s[i].substring(s[i].indexOf(">") 1,s[i].length);
}
}
strx = s.join("");
}
chop = (chop < strx.length-1) ? chop : strx.length-2;
while(strx.charAt(chop-1)!=' ' && strx.indexOf(' ',chop)!=-1) chop ;
strx = strx.substring(0,chop-1);
return strx '...';
}
function createSummaryAndThumb(pID){
var div = document.getElementById(pID);
var imgtag = "";
var img = div.getElementsByTagName("img");
var summ = summary_noimg;
if(img.length>=1) { 
imgtag = '<span style="float:left; padding:0px 10px 5px 0px;"><img src="' img[0].src '" width="' img_thumb_width 'px" height="' img_thumb_height 'px"/></span>';
summ = summary_img;
}
var summary = imgtag '<div>' removeHtmlTag(div.innerHTML,summ) '</div>';
div.innerHTML = summary;
}
//]]>
</script>


Now Find The code 

<data:post.body/>
and replace it by the below code


<b:if cond='data:blog.pageType != "item"'>
<div expr:id='"summary" data:post.id'><data:post.body/></div>
<script type='text/javascript'>createSummaryAndThumb("summary<data:post.id/>");
</script> <span class='rmlink' style='float:right;padding-top:20px;'><a expr:href='data:post.url'><img src='
http://i37.tinypic.com/351icqx.jpg'/></a></span>
</b:if>
<b:if cond='data:blog.pageType == "item"'><data:post.body/></b:if>

Click Save Template .. You are Done


Change http://i37.tinypic.com/351icqx.jpg 
Code with The One You Like Bellow

http://i643.photobucket.com/albums/uu153/nirav07/blue.png

http://i643.photobucket.com/albums/uu153/nirav07/bluish.png

http://i643.photobucket.com/albums/uu153/nirav07/dark-bluish.png

http://i643.photobucket.com/albums/uu153/nirav07/dark-orange.gif

http://i643.photobucket.com/albums/uu153/nirav07/green.png

http://i643.photobucket.com/albums/uu153/nirav07/greenish.png

http://i643.photobucket.com/albums/uu153/nirav07/grey.png

http://i643.photobucket.com/albums/uu153/nirav07/light-blue.png

http://i643.photobucket.com/albums/uu153/nirav07/orange.png

http://i643.photobucket.com/albums/uu153/nirav07/pink.png


Read More

உங்களின் BLOGGERஐ DOMAINக்கு எப்படி மாற்றலாம்


உங்களின் பிளாக்கர் நல்ல TRAFFIC இருக்கும் .அதே சமயத்தில் நீங்கள் .COM,.CO.IN,.NET,.INFO க்கு மாற்றலாம்னு நினைபிங்க கண்டிப்பா உங்கள் BLOGGERஐ DOMAINக்கு மாற்றலாம்.
1.First உங்களின் bloggerஐ sign inசெய்துக்கொள்ளுங்கள் .
 பிறகு  Dashboard > Settings > Publishing செல்லவும் .


2. பிறகு  click on Switch to "Custom Domain".


  custom domain
3.google domain registerக்கு 10$ செலவு ஆகும் .அதற்க்கு முனனால் நீங்கள் விரும்பும் domain name available உள்ளதா என தெரிந்துக்கொள்ளுங்கள் .Ex: raghuvarman.com
  enter custom domain
Take note: Your readers won't be left behind!


notice

your link on their blog roll because it will be automatically redirected to your new domain.


உங்களின் domain check available செய்த பிறகு அதை purchase செய்ய சொல்வார்கள் 

"Powered by GoDaddy.com" or "Powered by eNom". இந்த இரண்டு  domain registration partners of Google. Click on "Learn more" to switch between them. என்னுடைய  suggest GoDaddy.com.

godaddy and enom

  continue with the registration.

Enter your domain name information and remember to check "Automatically renew my registration every year" if you want to keep this domain.


மேலும் இதற்க்கு முக்கியமா credit card/debit card கண்டிப்பா தேவை .இந்த கார்டு purchase செய்வதற்கு பயன்படும் .
நன்றி வணக்கம் ..
Read More

BLOGGERஇல் உள்ள NAVABAR ஐ எப்படி நீக்கலாம்


பெரும்பாலும் எல்லோரடைய BLOGGER லும் NAVABAR இருக்கும் என்று நினைக்கிறேன்  இதை எப்படி நீக்கலாம் என்பதிப்பற்றி பார்ப்போம் 

நீங்க இப்ப பார்க்கிற image தான் navabar 
blogger navbar

நிறைய PEOPLE SEARCH ENGINE மூலமா இதை எப்படி REMOVE பண்ணலாம் என்று KEYWORD வழியாக தேடுறாங்க "Ex:how to remove navabar from my blog"  இதனால் நம்மோடய blogger இன் அழகு மேலும் கூடும் என்பதில் சந்தேகம் இல்லை .நா ரொம்ப பேசறன்னு நினைக்கிறான் ..

1. உங்களின் blogger account ஐ singn in செய்து account open செய்யவும் .

click the layout button
மேலே படத்தில் காட்டப்பட்டுள்ள layout click செய்து உள்ளே செல்லவும் .

2. அடுத்ததாக edit html tabஐ கிளிக் செய்து html pageக்கு செல்லவும். 

   edit html

3.இந்த html code ஐ கீழே படத்தில் காட்டப்பட்டுள்ள html code க்கு பதிலாக copy மற்றும் paste செய்யவும் .
#navbar {
height: 0px;
visibility: hidden;
display: none;
}

add the code like this

இபொழுது save செய்து உங்களின் blogger ஐ பார்க்கவும் .இங்கு navabar hide தான் செய்யப்பட்டிருக்கும் ஆனால் முற்றிலுமாக நீக்கப்பட்டிருக்காது என்பதை தெரிவித்துக்கொள்கிறேன் .


Read More

உங்களின் WEBSITE GOOGLE SEARCH ENGINE TOP 10 இல் கொண்டுவரணுமா


பிளாக்கர் ,DOMAINE SITE ஆரம்பிச்சிருப்பாங்க ஆனால் இணையதளதிற்கு வருகை தரும் VISITORS இன் எண்ணிக்கை மிகவும் குறைவாகவே இருக்கும் .இதற்கு என்ன காரணம் ?...சரியான KEYWORDS நீங்க தேர்ந்தெடுக்கவில்லை என்றே அர்த்தம் ..K இதற்கு என்ன செய்தா உங்க இணையதளத்திற்கு VISITORS வருவாங்க அப்டின்னு இப்ப பார்ப்போம் ..அதுக்கு முன்னால ஒரு சின்ன EXAMPLE :
GOOGLE ENGINE இல் கம்ப்யூட்டர் டிப்ஸ் KEYWORD கொண்டு SEARCH பண்ணுங்க ...கீழே படத்தை பாருங்க 
google

www.raghuvarman.co.cc இந்த இணையதளம் தான் first இடத்தை தக்க வைத்துக்கொண்டுள்ளது . இது நீங்களும் keyword select செய்து உங்களின் blogger or domain site build செய்ய்ங்கள் கண்டிப்பாக visitors அதிகாமாக வருவாங்க ..traffic அதிகமாகும் ..

உங்களின் ப்ளாகரில் design->html இல்  <head>க்கு கீழே இந்த meta tag ஐ copy செய்து சிவப்பு கலரில் உள்ள பகுதியை மட்டும் நீங்கள் edit செய்து save செய்து கொள்ளுங்கள் ..
<b:include data='blog' name='all-head-content'/><meta content=' your description ' name='description'/><meta content='your keywords' name='keywords'/><meta content='your name' name='author'/>

ஒன்று அல்லது இரண்டு மாதங்களில் உங்களின் இணையதளமும் top 10 இல் வரும் .
கீழே உள்ள ஒட்டுப்பட்டையில் உங்களின் ஓட்டை பதிவு செய்ய மறந்திடாதிங்க..நன்றி ..


Read More

SETUP ADSENSE DOMAIN USING FREE DOMAIN CO.CC

1. Login to your Google Adsense account, click the Adsense Setup tab at the top and then select Adsense for Domains.
2. Enter your domain name
கீழே உள்ள படத்தை பார்த்து உங்களின் domain add பண்ணுங்க ..
3. இங்கே உங்களின் adsense pub id  verify செய்துக்கொள்ளுங்கள்  (pub-xxxx).
4. Login to your Co.cc account பிறகு select Domain Settings.
5.  உங்களின் domain setup click செய்து 2 zone இல் கொடுக்கப்பட்ட setting ஐ பதிவு செய்துக்கொள்ளுங்கள் ..save ok..
6. The last step is you must enter your CNAME. Just enter “pub-xxxxx.ard.ghs.google.com”. Replace xxxx with your Adsense publisher code.
7. Congratulations, உங்களின்  Co.cc free domain setup   adsense domain மாற்றம் செய்தது உறுதி செய்யப்பட்டதுன்னு message வரும் .
உங்களின் ஓட்டை பதிவு செய்ய மறந்திடாதிங்க நன்றி ..
Read More